Vim configuration for happy Java coding
During the last couple of years, I gradually moved to Vim for editing text and writing code. It’s not an easy journey: Vim requires dedication and it’s sheer amount of options and plugins can be intimidating for a newcomer. However, with enough perseverance, the VIM’s approach to manipulating text becomes natural and you will not look back (enough with the Vim advocating, there are countless blog posts discussing the marvels of Vim).
In this post, I’m presenting my current Vim configuration for working with Java and Groovy projects. There are lots of folks who run away screaming when you try to suggest they abandon one of the mainstream IDEs (Eclipse, IntelliJ, Netbeans) and move to Vim. How will you do without auto-completion? How do you navigate files? How do you refactor? How do you jump to a function definition? It turns out that you can do most of that stuff in VIM. Refactoring it’s probably the only functionality that is hard to achieve, even if it’s not an impossible goal (Eclim partially supports that).
I’m not going to try to convince you that Vim is better than your favorite Java IDE, especially if you have never used Vim before. I have never felt very comfortable working inside one of the heavyweight IDEs and my productivity is just higher when I work with my VIM setup. Your mileage may vary, but I encourage you to take a spin.
(As a side note, James Gosling famously stated that you’d better use an IDE if you want to code in Java.)
This setup has been tested on OSX 10.8 and MacVim.
Setup
I assume you use Pathogen for managing your VIM plugins. If you don’t, I highly recommend you do (or look into other bundle managers, like Vundle).
If you are on a Mac you should use MacVim and you should install it using Homebrew.
Java and Groovy syntax highlighting
MacVim comes with a truckload of syntax highlighting files, including Java and Groovy.
In order for syntax highlighting to work, add
syntax on
to your .vimrc file.
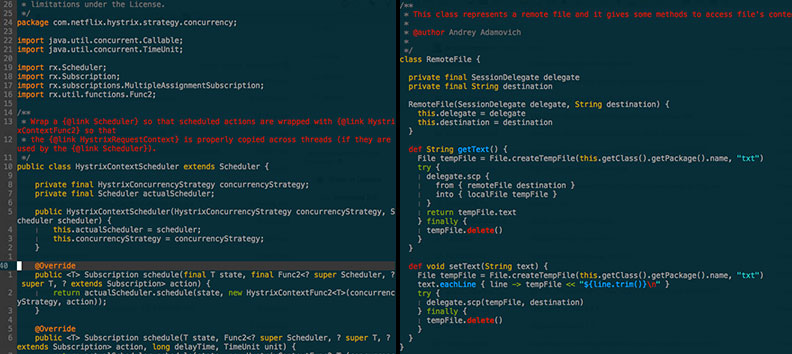
This is how Java and Groovy files look like in Vim:
If you are using a recent version of MacVim (7.4 or higher) chances are that the Groovy syntax file is broken.
In order to fix the syntax issue, open the groovy.vim file located in /usr/local/Cellar/macvim/7.4-xx/MacVim.app/Contents/Resources/vim/runtime/syntax and comment out line 260.
Snippets
Snippets are essential to decrease typing and increase the speed of development. All modern IDEs support snippets (also known as templates) with different level of configurability.
After testing different snippet plugins for Vim, I settled with UltiSnips. It requires a version of Vim compiled with Python. If you use MacVim installed with Homebrew, you should be all set.
To check if your Vim installation is compiled with Python support, type:
$ vim --version | grep python
+cryptv   +linebreak    +python    +viminfo
+cscope   +lispindent   -python3   +vreplace
If you see +python you are good to go.
Install UltiSnips in your ~/.vim/bundle folder:
git clone https://github.com/SirVer/ultisnips.git
Ultisnips has several Java snippets already configured and ready to use. You can create new snippets by adding a java.snippets file to a ~/.vim/snippets folder.
If you add your own snippets, do not forget to configure Ultisnips to access also your own snippets.
let g:UltiSnipsSnippetDirectories=["UltiSnips", "snippets"]
This is an example of UltiSnips in action:
UltiSnips snippets use placeholders for inserting custom data:
snippet co "constant" b
public static final ${1:String} ${2:var} = $3;$0
endsnippet
The previous snippet (triggered by co) create the following statement:
public static final String var = ;
and places the cursor on String. By pressing <CTRL+j> you can move the cursor to the remaining placeholders, defined with ${1}, ${2} and so on. The placeholder marked with ${0} is always the last one the cursor will move to.
Indent highlight
Java and Groovy code can display several levels of indentation. To help keeping track of the code blocks I use the IndentLine plugin. There are several other plugins that offer the same functionality, but I kind of like the simplicity of this one.
To install IndentLine, clone the repo into your ~/.vim/bundle folder:
git clone https://github.com/Yggdroot/indentLine.git
I configure mine like so:
" vertical line indentation
let g:indentLine_color_term = 239
let g:indentLine_color_gui = '#09AA08'
let g:indentLine_char = '│'
Please note that Vim natively supports visual guides for tab-indented blocks. This StackOverflow answer clearly shows the settings to enable indentation guide and remove tabs before saving a file.
Auto completion
Vim basic auto completion for Java is an essential feature for working with third-part libraries and large code bases. On my quest for the perfect Java/Vim setup, I started using Javacomplete which never really worked as well as any IDE in terms of auto completion. I knew of the existence of Eclim but I kind feel like cheating to resort to an headless Eclipse for my auto completion needs. Additionally, I considered the setup a bit too complex. Eventually, I decided to try out Eclim and have been very satisfied with the Vim integration. Eclim documentation is excellent and the bundle integrates well with other plugins, like supertab (more on supertab later).
The only drawback is that you need to install Eclipse. I consider IntelliJ a superior platform but I still use Eclipse with the Geppetto plugin to edit Puppet files.
Installing Eclim
The installation page for Eclim is quite comprehensive. The basic installation steps are:
wget http://downloads.sourceforge.net/project/eclim/eclim/2.3.2/eclim_2.3.2.jar
java -jar eclim_2.3.2.jar
eclim 2.3.2 is the package to download if you have Eclipse 4.3.x (Kepler). There is a different package for older versions of Eclipse.
The installer has a graphical interface and it only requires to select the current Eclipse installation and additional packages (for example, Scala). It takes just a couple of minutes.
Once the installation is completed, you want to start the Eclipse headless daemon using:
$ECLIPSE_HOME/eclimd
The boot procedure takes around 30 seconds.
To test that Vim can “talk” to Eclipse, open Vim and type
:PingEclim
If your output says something like
eclim   2.3.2
eclipse 4.3.0
you should have a working integration.
Finally, you must create a new Eclipse project or import an existing one.
My workflow revolves around Gradle, a Groovy based build tool which is getting a phenomenal amount of traction. This is what I do (using a script):
mkdir my-awesome-project && cd $_
gradle setupBuild --type java-library
perl -i -lne 'print $_;print "apply plugin: \x27eclipse\x27" if(/apply/);' build.gradle
gradle eclipse
Then from inside Vim:
:ProjectImport .
The first line creates a new folder named my-awesome-project. The second line calls Gradle’s project generation feature (similar to Maven archetypes). The third line adds the Eclipse plugin to the Gradle build file.
Finally I invoke gradle plugin to generate the Eclipse project files.
In this short video, you can see a couple of Eclim’s features:
- Automatically adding an import (
:JavaImport) - Automatically adding a getter and setter (
:JavaGetSet)

For a complete list of Eclim commands, please refer to this cheatsheet.
Supertab
The second auto completition plugin is Supertab. It essentially allows completing using the <TAB> key instead of the standard <CTRL+X><CTRL+N>, when in insert mode. It plays nicely with Eclim, even though some fiddling is required.
To install Supertab, clone the repo in your .vim/bundle folder:
git clone https://github.com/ervandew/supertab.git
Delimitmate
DelimitMate provides automatic closing of quotes, parenthesis, brackets, etc. A real time saver. The plugin works pretty well out-of-the-box and I didn’t find any compatibility issue with the other plugins.
To install Delimitmate, clone the repo in your Pathogen bundle folder.
git clone https://github.com/Raimondi/delimitMate.git
This is the only setting I have modified for this plugin:
let delimitMate_expand_cr = 1
Check out help delimitMate to learn about other options that may better serve your workflow.
File browsing
Eclim can display a project navigation pane by issuing the :ProjectTree command, but I still prefer NERD tree to visualize my project’s files.
NERD tree is a very popular plugin with tons of documentation: these blog posts contain all the information to get you started with this plugin.
Install NERD tree by cloning the Github repo in your bundle folder.
git clone https://github.com/scrooloose/nerdtree
My NERD tree configuration is kept to a minimum: I have only mapped <CTRL-d> to toggle the file browsing pane.
nmap <leader>d :NERDTreeToggle<CR>
CtrlP
If you have been using Vim for a while, CtrlP is surely in your bundle folder. It’s a fuzzy finder for files, buffers, MRU and even tags. I have mapped CtrlP to <CTRL+t> and I can use the binding to type the first letters of the file I want to open.
CtrlP is the equivalent of <CTRL + ALT + N> in IntelliJ Idea and <CTRL-SHIFT-T> in Eclipse.
For example, if I want to open a file named LibraryTest.java I can type <CTRL+t LT> (LT = LibraryTest). This plugin is indispensable when working on large projects with hundreds of files.
Install CtrlP by cloning the repo in your Pathogen’s bundle folder:
git clone https://github.com/kien/ctrlp.vim
These are my setting for the plugin:
" Use <leader>t to open ctrlp
let g:ctrlp_map = '<leader>t'
" Ignore these directories
set wildignore+=*/build/**
" disable caching
let g:ctrlp_use_caching=0
Building
The last part of my Vim setup is related to building and running Java or Groovy tests. As I have mentioned previously, I use Gradle to build my Java/Groovy projects.
Gradle works similarly to Ant or Maven. A build.gradle file is placed in the project’s root directory and a Gradle process runs the build based on the build file content.
A Gradle build is launched from the command line like so:
gradle clean build
gradle test
Vim is built with support for compiler integration and the MacVim distribution comes with over 60 compiler configurations. Unfortunately Gradle is not among the supported compilers so I had to create my own Gradle compiler file, with a little help from Niklas.
With the Gradle compiler file in place, I can now set the compiler to Gradle using :compiler gradle and run my tests by typing make test. This solution works for both Java and Groovy projects, as long as you use Gradle as a build tool.
I have mapped everything to the <F4> key, like so:
map <F4> :w<CR> :compiler gradle<CR> :make test<CR>:cw 4<CR>
When pressing <F4>, Vim saves the current file, run the Gradle compilation and open the QuickFix window if there are compilation errors or test do not pass.
There is one gotcha: the QuickFix window is supposed to show compilation errors that you can “navigate” using <:cn> or <:cp> and even jump to the file reported in the errors list. This functionality is based on the assumption that the compiler output is properly parsed, which is not the case for Gradle. Still, I’m able to display the compilation/test errors in the QuickFix window.
I’m currently working on a solution (based on this forum entry) for having Gradle and the QuickFix window to play together nicely.
This is how the test feedback loop looks like:

Maven
In case you Maven is your build tool of choice, you can use Eclim to build the project using the Eclim command :Mvn.
vim-rooter
One more plugin is required for the compilation to work correctly in my setup. By default, the :make command is executed inside the directory of the currently open file. If I have a test case opened in src/test/java/my/awesome/package and I call :make, the Gradle process will be executed inside that directory and will obviously fail. Gradle requires a build.gradle in order to work.
We need Vim to change the current directory to the project’s root folder. The vim-rooter plugin has this exact functionality. It detects the project root by the presence of known directories, like .git or files like Rakefile.
It’s a simple plugin that doesn’t require any additional configuration. To install it, clone the Github repo into your bundle folder.
git clone https://github.com/airblade/vim-rooter.git
I hope that this rather lengthy guide will encourage you to try out Vim for your daily development activities.